What, me? NO! I don’t know what you’ve heard, but I would never…NEVER!! I SWEAR!! I mean, probably never… NO! There are FOUR LIGHTS!!! I’ll never crack so OMG JUST STOP ASKING OKAY OKAY OKAY FINE I DID IT I JOINED PINTEREST NOW ARE YOU HAPPY???
How do I feel about Pinterest, you ask? I hate it. HATE IT. In a weirdly irresistible way. Do you remember Choose Your Own Adventures? I despised those books. I would read them through once the way you were supposed to, and then I would go back, choice by choice, to read each of the other possible paths in a logical, step-wise fashion, until I had uncovered all of the possible permutations. Pinterest is one giant, frustrating, inescapable, Choose Your Own Adventure. Trying to take it all in is like, as my big brother so aptly described the internet in 1995, drinking from a fire hose.
As a blogger, I decided that I needed a Pinterest presence, so I joined, but I have composed a Pinterest Code of Conduct to keep my usage under control:
1. I will NOT travel more than 2 layers deep from any 1 pin (if I click on a pin, and it shows me a board, and I click on another pin on that board, I will NOT go any farther).
2. I will ONLY repin those DIY or craft ideas I can envision myself ACTUALLY DOING in the foreseeable future. Or ever.
3. I will NOT repin a pin without first clicking through to the original link, thus saving myself from the embarrassment of repinning something like this

Screenshot of infamous “water marbles” pin.
©PicklesINK 2013
with the caption, “Water marbles! Crazy how a few kitchen ingredients will make these. Weird, I can’t wait to try,” which when clicked, directs you not to the instructions you are expecting but instead to an article decrying the whole concept as a video hoax.
4. If I try something, and it doesn’t work, I will comment on it to save others the frustration. (WD-40 to clean your burner pans? DOESN’T WORK. Just FYI.)
Signed ______________________
I encourage you to take the Pinterest Pledge too!
Having waded through Pinterest for a couple of weeks, following the rules I set for myself, I do have one amazing success story — yesterday, combining ideas from a couple of pins (how to make a skirt out of a men’s shirt and how to make a child’s dress out of an old t-shirt), I FREAKING MADE A DRESS FOR MOLLY.
My to-do list for this week included:

To-do list excerpt:
– learn to sew
– make cool stuff
©PicklesINK 2013
Simple enough, right? I had been looking at tutorials for how to make grown-up tank-top/t-shirt/men’s shirt dresses and got all excited to make one for myself. Then I tried to wrap one of Ian’s old shirts around my waist and realized that for it to work, either my hips had to be a size XXXS or the shirt had to be an XXXL.
New plan: Dress for Molly!

Molly in upcycled shirt(s) dress.
©PicklesINK 2013
Without further ado, I present to you:
How to make a toddler dress out of a child’s t-shirt and a men’s dress shirt.
Please note I am the most NOVICE of sew-ers so my sewing instructions will be vague and the terminology probably entirely inaccurate.
You will need: scissors, child’s shirt, men’s dress shirt, sewing machine, pins.

Child’s shirt, men’s shirt, scissors (not pictured: sewing machine, pins)
©PicklesINK 2013
1. Cut off the child’s shirt 1″ below where you want the skirt to be attached and cut off the men’s shirt just below the armpits or just below the pocket if there is one.
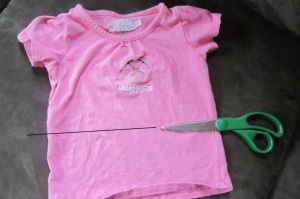
Where to cut child’s shirt
©PicklesINK 2013

Where to cut men’s shirt
©PicklesINK 2013
2. Sew a gathering seam on the men’s shirt: Set your stitch length to a long setting (4 or 5) and sew a seam all the way around about 1″ below where you cut. Knot one end of both threads and then pull on the other end, sliding the fabric back on the thread to gather it. Gather it until it is the same circumference as the bottom of the child’s shirt and then spread the gathers evenly and knot the other end of the threads. If I’m not explaining this well, Google it or check your sewing machine’s instruction manual, but you probably know how to do it better than I do!
3. Pin the top of the men’s shirt (now the skirt) and the bottom of the child’s shirt (now the bodice) together with the outsides facing in to each other.

The inside of the dress at the waist seam.
©PicklesINK 2013
4. Sew this seam together. I tried to do this with a straight stretch stitch, but I don’t think I was particularly successful (it doesn’t really stretch) and still seams (heheheheh) fine. Now turn it right side out and admire your work!

Finished dress. PRAISE ME!! PRAISE ME!!
©PicklesINK 2013
5. If there is a pocket, and if you want to, carefully detach the pocket from the leftover piece of men’s shirt and reattach it to the skirt (Molly LOVES pockets, so this was the highlight of the dress for her).
6. Show it to everyone you know, either in person or through the use of social media, because you are SEW FREAKING AWESOME!!!! <—- see what I did there??
Who knows? Maybe there’s hope for me and this Pinterest thing after all.
~ karyn

There are FOUR lights (Pinterest logo).
©PicklesINK 2013