Last Sunday was Palm (or Passion) Sunday in the Christian calendar, which commemorates Jesus’ triumphal entry into Jerusalem, where crowds greeted him by waving and covering his path with palm branches, and marks the beginning of Holy Week. Many churches distribute palm branches or fronds for people to wave as part of the worship service.
For our Palm Sunday service, I rashly volunteered to go looking for individual palm strips that could be folded into crosses for Easter. “Who will fold them?” they asked. “Oh, I’ll do it,” I said. “How much work could it possibly be?” *Cue evil laugh track*
After the Palm Sunday service, I came home with the bag of still fresh palm strips and I asked my good friend Google, “Seriously, Google? How hard COULD it be?”

Bag of (purportedly) 100 palm strips. Actually more like 150 as many of them were made up of 2 layers stuck together.
©PicklesINK 2013
Google replied, “Mwah hah hah hah hah…!” but also helpfully directed me to some instructional websites and I got to work.
I found a lot of the instructions and pictures tough to follow, so I decided to try my hand at making one of my own. Please note that unlike the actual palm strips, the paper I used is blue on one side and white on the other so you see how the folds really go! The wider end of the palm/paper is the bottom and narrower part the top; if it’s really stringy at the top, trim it. If it’s extra wide (more than 1.5″), cut a notch at the bottom and peel the two halves apart to make 2 strips.

Blue strip of paper cleverly trimmed into palm strip shape
©PicklesINK 2013
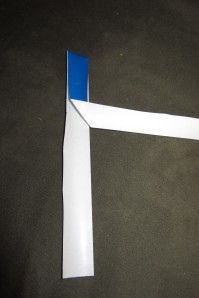
Fold #1: Fold the top straight down over the bottom at the height that you would like the cross to be (in this case, about 5″).

Fold #1: Fold top down over bottom. From bottom to fold will be the height of your cross.
©PicklesINK 2013
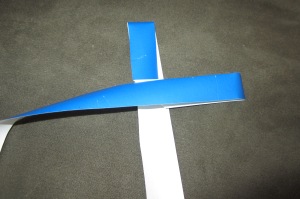
Fold #2: Fold to the right at a 45° angle to start to form the first arm of the cross.

Fold #2: Fold to the right at a 45° angle
©PicklesINK 2013
Fold #3: Fold straight back towards the left to complete that arm and start to form the second arm of the cross.

Fold #3: Fold straight back towards the left.
©PicklesINK 2013
Fold #4: Fold underneath to complete the second arm. The paper/palm should pass behind the cross.

Fold #4: Fold underneath to complete the second arm.
©PicklesINK 2013
Turn over.

This is what is should look like when turned over after Fold #4.
©PicklesINK 2013
Fold #5: Holding the cross together in the middle, fold strip at a 45° angle to pass behind cross from top left to bottom right.

Fold #5: Holding the cross together, fold strip at a 45° angle to pass behind cross from top left to bottom right.
©PicklesINK 2013
Fold #6: Fold from bottom right straight across to bottom left (keep holding middle of cross together).

Fold #6: Fold from bottom right straight across to bottom left.
©PicklesINK 2013
Fold #7: Fold up at 45° angle so strip passes behind cross from bottom left to top right.

Fold #7: Fold up at 45° angle so strip passes behind cross from bottom left to top right.
©PicklesINK 2013
Fold #8: Pass top of strip over top right and tuck into where the strip wraps around the bottom of the cross.

Fold #8: Pass top of strip over top right and tuck into where the strip wraps around the bottom of the cross.
©PicklesINK 2013
Then pull tight.

Fold #8 pulled tight.
©PicklesINK 2013
Turn over and trim excess to finish.

Trimmed, completed cross.
©PicklesINK 2013
Here are some of the real thin, front and back, in various sizes.

Completed palm crosses, front and back.
And here I am with crazy eyes having just spent the last 4 hours making 187 of them!!

Karyn with crazy eyes and 187 palm crosses in a basket.
©PicklesINK 2013
It was strangely soothing, as repetitive tactile experiences go. When we delivered them to the church, Ian proudly declared, “Oh, it was easy! At least, it didn’t look that hard…”
~ karyn


